Using GitHub Actions to Deploy to AWS
Antonio Suljić
/ 2023-08-071. Introduction to GitHub Actions
GitHub Actions allows developers to automate workflows and tasks associated with building, testing, and deploying their applications. Workflows can be customized to fit the specific needs of the project and can be triggered by events such as pull requests, commits, or releases. GitHub Actions is designed to be code-centric, which means that workflows are defined within the repository itself.
With GitHub Actions, you can integrate your code with, e.g., Amazon Web Services(AWS) to streamline your development process. Integrating GitHub Enterprise with AWS using GitHub Actions can help you automate your infrastructure deployment and improve your overall development workflow.
The following example is conducted inside the repository that is described in the blog.
Workflows must be stored in the .github/workflows directory of the repository. Workflow files are stored with the .yml extension.

1.1 GitHub Events, Context, Basic Syntax
Workflow is a pipeline that will get triggered on a certain event. The event is defined in the beginning of the workflow code.
For example, we have a ‘create_branch.yml’ workflow which gets triggered on a ‘create’ event, in other words, it gets created if a new branch or tag is created.
Another example would be ‘pr_opened.yml’ which gets triggered when there is a new pull request opened or synchronized (this event occurs when we push an update to the branch which is associated with the already opened pull request) towards ‘development’, ‘stage’ or ‘production’ branches.
GitHub Context is used to access metadata which GitHub stores during the workflow execution. That means that we can access certain data such as base branch, commit id, event etc.
For example, if you see
${{ github.base_ref }}
in the code, that expression is accessing context to get the information about which branch is the base branch of this event. In other words, if the event is ‘pull_request’ – then the base branch is the branch that is getting merged into the environment branch. In our case that would be the feature branch.

GitHub workflows use specific syntax to access information such as variables, secrets, contexts etc. If we want to access a secret, we will type:
${{ secrets.SECRET_NAME }}
or for variables:
${{ vars.VARIABLE_NAME }}
To expand understanding of the workflow syntax, please refer to the documentation here.
1.2 Example Description
In our example, we have two workflows – “Create Branch Workflow” and “PR Opened Workflow”.
“Create Branch Workflow” is based on the repository level restriction, while “PR Opened Workflow” is our deployment link to AWS.
Our repository setup has three environment branches – ‘development’, ‘stage’, ‘production’. We have one AWS account, that is why you will see that we are deleting CloudFormation stacks created from ‘development’ and ‘stage’ environments; those deployments serve as test deployments, while deployments from ‘production’ environment serve as an official deployment.
Ideally, we would have separate AWS accounts for each of the environments, but this example will serve its purpose to show how to use GitHub Actions for flexible repository-level restriction and integration with AWS by using AWS CLI and GitHub Marketplace.
GitHub Marketplace is a platform where you can find apps (actions) which can be integrated in the workflow. Action provides an out-of-the-box solution which can streamline and improve workflow.
Besides workflows, branches contain CloudFormation template called ‘s3_bucket.yml’ that looks like this:

This template, when deployed, creates an S3 bucket. The purpose of this template is to showcase AWS integration with GitHub Enterprise, so it is not necessary to describe it for this blog.
1.3 create_branch.yml
This is a GitHub workflow that is triggered whenever a new branch is created in the repository. The workflow is designed to validate the branch name and ensure that it adheres to a specific naming convention.

The workflow consists of a single job called "create-branch" that runs on the latest version of the Ubuntu operating system. The job includes two steps:
-
Checkout Repository: This step uses the "actions/checkout" action to check out the repository and ensure that the latest changes are available for subsequent steps. The step uses the "GITHUB_TOKEN" secret to authenticate with the GitHub API (Application Programming Interface). This is a default secret token which does not need to be created manually.
-
Validate branch name: This step validates the name of the newly created branch to ensure that it starts with the prefix "feature/". If the branch name does not start with this prefix, the step deletes the branch and generates an error message. If the branch name is valid, the step generates a success message.
The "if" statement at the beginning of the job ensures that the job is only executed if the event that triggered the workflow is a branch creation event. If the event is not a branch creation event, the job is skipped.
This basic workflow helps to ensure that all new branches in the repository adhere to a specific naming convention, which can help to improve consistency and organization in the development process. This is an example of how we can use GitHub workflow to enforce developers to adhere to the non-native rules.
1.3.1 Workflow Results
This workflow should be successful if user creates a new branch called “feature/description” where ‘description’ part can be anything – the only important thing is the “feature/” portion.
That implies that the workflow should fail if user creates a new branch which does not start with “feature/”.
Let’s test the use case in which workflow should be successful.

Firstly, we should create a feature branch named “feature/my-branch”.

Then the workflow should get triggered.

The workflow ran successfully without any errors.
Now, let's test the use case in which workflow should fail.

Creating branch called ‘my-branch’ – notice that we did not put “feature/” prefix.

The workflow is triggered.

The workflow returned an error and deleted the branch.
1.4 pr_opened.yml
This is a GitHub workflow that is triggered whenever a new pull request is opened. In this case, the workflow will run when a pull request is opened or synchronized on one of the specified branches: development, stage, or production. The workflow is designated to validate the CloudFormation template, deploy to the AWS account and delete the CloudFormation stack if the target branch is not ‘production’.

We will go through the code - section by section.

This section defines the event that will trigger the workflow. In this case, the workflow will run when a pull request is opened or synchronized on one of the specified branches: development, stage, or production.

This section defines the required permissions for the workflow to run. The id-token permission is set to write, which allows the workflow to create or delete branch heads, and the contents permission is set to write, which allows the workflow to create or update files in the repository.
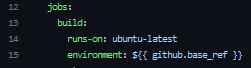
This section defines the job that will run when the workflow is triggered. The build job runs on a ubuntu-latest machine and in a specific GitHub environment based on the “github.base_ref”. The “github.base_ref” variable is set to the base branch of the pull request.

This step checks out the head branch of the pull request using the “actions/checkout” action. It uses the GITHUB_TOKEN secret to authenticate with GitHub and fetches the entire commit history (fetch-depth: 0).

This step configures the AWS credentials using the “aws-actions/configure-aws-credentials” action. It specifies the AWS region, the role to assume, and the duration of the assumed role.

This step validates a CloudFormation template using AWS CLI. It uses the “aws cloudformation validate-template” command to validate the template named “s3_bucket.yml”.

This step deploys the CloudFormation template using the “aws-actions/aws-cloudformation-github-deploy” action. It specifies the name of the CloudFormation stack, the template file, and the parameter overrides. The if statement ensures that this step only runs if the previous step was successful.

This step waits for 30 seconds before proceeding to the next step, this gives us just enough time to check CloudFormation logs and validate that everything is created as expected.

This step will delete the CloudFormation stack if the infrastructure was not deployed from ‘production’. That is because if we deploy from either ‘development’ or ‘stage’ that is just for testing, while if we deploy from ‘production’, that should be permanent change.
1.4.1 Workflow Results
This workflow will get triggered when a new pull request is created towards the environment branch. Let’s test that.

Creating a new pull request from “feature/new-feature” to “development”.

This is how the pull request looks initially. Notice that merging is blocked because the check (workflow job) is required to pass successfully, and we also need a review from code owner (Marin in this case).

While the workflow is running, we can look at CloudFormation to check if our stack is created and deleted as defined in the code. We can see that everything is running as expected and that the stack is deleted.

We can see that the workflow is executed successfully, therefore Marin will approve the pull request.

After Marin approved the pull request, we can merge “feature/new-branch” to “development” branch.
2. Conclusion
In conclusion, we have covered basic example of using GH Actions in GH Enterprise to manage simple infrastructure on AWS. That includes using GH Actions to deploy CloudFormation template to AWS.
I hope this blog has given you a good overview of GitHub Enterprise and its capabilities. Whether you are a developer or project owner, you should now feel more confident about exploring GH Enterprise world and leveraging its advanced features.
Nevertheless, the features covered in this blog are not all functionalities of GH Enterprise, so we encourage you to explore it as it provides a variety of flexible solutions that will help your organization.
Rest assured that our dedicated DevSecOps team is here to support you every step of the way. Whether it's designing, managing, or building infrastructures within GitHub Enterprise, we have you covered. Don't hesitate to reach out to us or share your thoughts here. We're always ready to provide assistance and help you succeed!