Mimic Custom Apps In Microstrategy: panel stack + selector... and a bit of Javascript
iOLAP
/ 2018-04-11Ever want to trigger exports or other actions from a dropdown on your report services document in MicroStrategy? One of my recent engagements required this functionality to mimic existing custom applications that customers were already familiar with. Sure, this could be easily accomplished with a single HTML container with a select element and some javascript. What if you had other selectors already on your document and you wanted a consistent look and feel? Enter the panel stack, HTML container, a panel selector and a little bit of javascript.
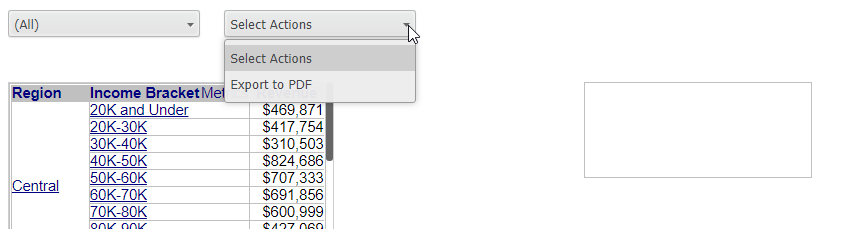
The concept here is rather simple: create some javascript to launch a URL API event for export that triggers when a panel is selected. Here we have a report services document created from a dataset found in the tutorial. There are just four objects: grid with an attribute element selector to manipulate the displayed data, a panel stack with two panels and a panel selector dropdown.


In this example, the panel stack has two panels: Select Actions and Export to PDF. These titles will show in the dropdown panel selector. In the Export to PDF panel, create an HTML container object and supply this code:
<script>
var action = "mstrWeb?evt=3069&src=mstrWeb.3069&executionMode=3&MessageID=" + mstrApp.docModel.mid;
mstrApp.docModel.executeLink(action, "_blank");
/* We have to unrender the panel in the stack, as by default it only
renders once.
*/
this.onRender = function onRender() {
this.unrender(true);
/* Inspect the HTML, get the widget K value, as we need to reset its
selection to the first element*/
var widgetId = "*lK3*kK57*x1*t" + mstrApp.docModel.buildTime;
var widget = mstrmojo.all[widgetId];
var selectorCtrl = widget.children[0];
selectorCtrl.list.singleSelect(0, false, null);
}
</script>
Now we need to replace the widgetId variable in this code with the value from the HTML source that is generated at runtime. You must right-click in the browser and “inspect element” on the control. Find the div that has css class with DocSelector as part of the value.

In this screenshot, the widgetID is the id of the container div for the selector: lK36kWB207381E60834640BE4C819FCD8EF1FFx1t1522867857695 but pasting this in the javascript in your HTML container will fail. This is because each widget in a page is given a unique ID at runtime. If you observe at the end of the ID value you will see “t1522867857695” which is a timestamp of the current time when the document was executed. We need to delete everything after the “t” to make the widgetId property value equal to “lK36kWB207381E60834640BE4C819FCD8EF1FFx1t”. As you will see in the javascript we append the build time (timestamp) to the widgetId. This ensures we are able to find the widget in the collection of all widgets.
When the panel is selected from the selector dropdown, the panel renders itself and a URL API link is created for the action variable, using the message ID of the current execution. Then the docModel’s executeLink function fires with the action (url) and supplies a target of “_blank” which will launch the URL in a new window. Easy? Yes.
There’s a catch: once the panel is rendered, that’s it. No more rendering. This means the javascript will never execute again unless the page is refreshed. Surely a less than ideal UX. Here’s where we fix that: override the panel’s onRender event handler. Poring over the mojo sources, I found it was as simple as calling unrender on the panel. Whew, now I can select the Export to PDF panel and continually export as many times as I want.
There’s a final catch: once you select the Export to PDF panel, the panel selector dropdown retains the selection. That’s because the current panel is the Export to PDF panel. How do you export again? One can trigger an export again by selecting Select Actions and then subsequently selecting Export to PDF. Again, surely a less than ideal UX. Now we get to use the widgetId we found via “inspect element” and do something with it. What do we do? We find the widget in the collection of all widgets and then get the selector object inside of it. Then we instruct the selector to select the first element via the singleSelect method. Bam! Now the dropdown selector is back to Select Actions and you can simply click Export to PDF again should you wish to export again.
By reverting the panel selector back to the first element, it also rectifies another unintended consequence. Without it, if a user selects Export to PDF and navigates away from this dashboard via perhaps an edit link and then uses the back picker to go back to this original dashboard, the export action fires again because MicroStrategy maintains the selections in the page history.
One last thing, in the screenshot of the document with all of the elements, you can see the border for the Panel Stack that contains the actions panels. That was solely for illustration purposes. Set the border to none. You could even shrink down the panel stack to a small size and place it anywhere on the document. If you wanted to add an Export to Excel, the process is the same. Add another panel to the stack and modify the action variable to a proper URL API for excel export.